
Explanation & Instructions
This calculator was built as an easy way to calculate an implant exchange after a refractive surprise. This is a simple “shortcut” method for generating the “steps” needed to get you closer to a plano “emmetropic” outcome.
HOW IT WORKS
To make your implant correction, you need to know how many implant power “steps” to make. Every IOL step increment (20.5 –> 20.0 –>19.5) will move the patient’s end refraction (-2.00 –> -1.65 –> -1.25) toward your final goal of plano vision. Implants usually come in half-diopter increments, but their refractive impact is smaller, often close to 0.35 diopters per change. This difference in rate can be thought of as a slope, ratio, or simple equation.
Several shortuct methods exist for calculating a new implant. A common one is to take your refractive surprise amount (let’s say -2.00 diopters of myopic surprise) and multiply that by 1.2. This gives a value of 3.4. That’s the amount you should change your IOL implant power — in this case, you’d probably round to 3 and change a 22.0 implant to a 19.0 implant, expecting an endpoint refraction of approximately -0.25.
The problem with this method? Math. Not hard math, but kinda fidly, and not the kind of thing you want to screw up on a redo surgery.
CREATING A CHART
When I’m faced with this situation, I assume that I’m an idiot who’s capable of making mistakes.
So I create a table:
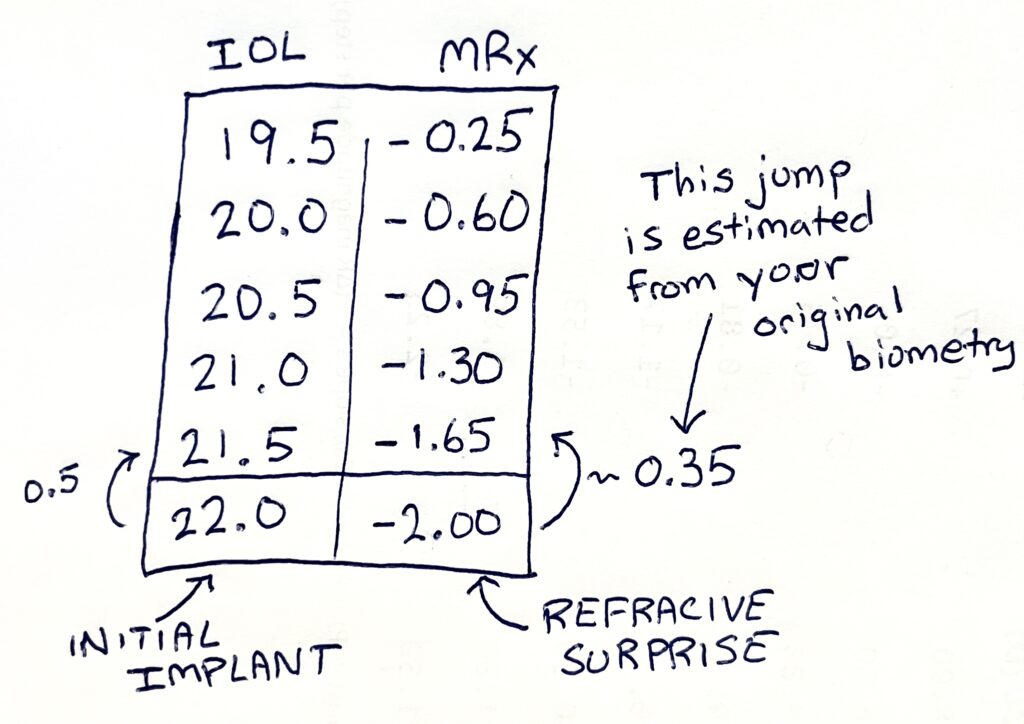
Most refractive surprises are myopic, so I’ll place my implant (example: 22.0) and the spherical refractive outcome of the patient (example -2.00 myopia).
I’ll then start moving upwards, changing my IOL in increments. This is almost always in half-diopter steps. The expected refraction is put on the right. This step is usually around 0.35, and can be roughly estimated on your original biometry. Go look at your IOL Master or Argos and calculate how big the refractive steps are for this range.
I keep extending my table rows upward until I hit my desired refractive outcome.
This is a simple ratio — there’s nothing high tech here. The tabular format lets me check my work to make sure it makes sense. I also feel that it decreases errors as my IOL choice is in the same format as my original biometry.
USING THE CALCULATOR
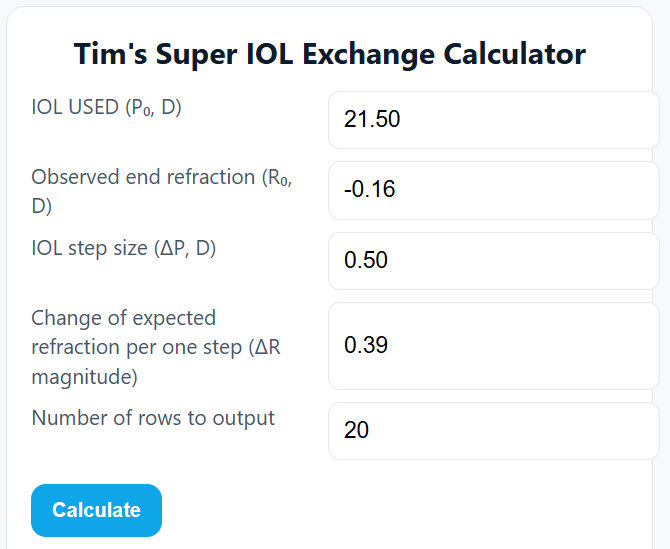
I built the calculator to help me build this table in a printable format. Here are the variables you’ll need to enter to make it work for you:
IOL USED: This is the original implant used on the patient
OBSERVED END REFRACTION: The final refraction of the postop patient in clinic. Use the “spherical equivalent,” obviously.
IOL STEP SIZE: Almost always half-diopter increments, unless you have a super short/long eye that requires specialty lenses.
CHANGE OF EXPECTED REFRACTION PER ONE STEP: This you can measure by looking at your original biometry. Just measure how much difference there is in estimated refraction with every row step on your sheet. It’s usually near 0.35.
NUMBER OF ROWS TO OUTPUT: If the table produced isn’t long enough to get you back to emmetropia, increase the row count until it is.
NOTE: Nothing entered on this page is saved or uploaded online. However, the data in this form is saved/cached in your computer’s browser. This means that you (or your staff) won’t lose your information if you walk away from the computer or the power fails. Just navigate back to this page and your data will likely still be here. Hit the reset button to erase the data entirely and set the calculator back to its default state.